

The Kettlebell Handbook: 50+ Key Tips & Terms for Beginners


What can you expect from this handbook?
Jumping into the world of kettlebells, this guide will give you all you need to know to get started understanding the key terms and principles related to training with kettlebells. By the end, you will be able to explore training methods that matter most to you with confidence.
Whether you are looking to join in with your first kettlebell class, or grab your first kettlebell for your home gym, this guide will be useful for you.
These tips and terms are split into three main parts, starting from the "anatomy" of the kettlebell and general fitness terms. Next, moving to a variety of common grips and positions. Finally the handbook will address some workout styles associated with kettlebell training
Let’s begin.
Part 1: The Anatomy of the Kettlebell
At first glance, there are just two main parts you can see which make up the kettlebell. However, this tool can be broken down into six named areas. These named areas will help you reference specifics later in your training. For example, which grip you may take for a particular exercise, or the position you will take with the kettlebell for the start of a complex. It all begins with these definitions.
Below is a diagram of the two most common styles of kettlebell, with each of their named areas marked out. On the left we have a "competition" style kettlebell, on the right we have a cast iron or "hard-style" kettlebell. The differences between the two will be discussed later in this guide.

The Kettlebell:
Handle - The top part of the kettlebell which is most commonly held in hand.
Corners - The edges of the handle where it begins to curve downward.
Horns - Also known as the sides of the handle.
Window - The open space between the handle and the main body of the kettlebell.
Body - The main bulky mass of the kettlebell.
Base/Bottom - The flat area on the underside of the kettlebell.
Common Exercise Terms and Tips
Here are a few more common pieces of terminology relating to kettlebells and general training principles which you might need to know.
1H/SA - One Hand/Single Arm - Exercises involving holding a kettlebell in one hand or with a single arm
2H - Two Hand - Exercises involving holding the kettlebell with two hands
SL - Single Leg - Exercises which require focus on a single leg at a time.
Dbl. - Double Kettlebell (typically one held in either hand).
Alt. - Alternating sides of the body. I.e., If your programme says Alt. Lunge. Ensure you lunge on both sides so that they are targeted evenly.
Intervals - An interval is a period of time in your working sets/rounds, usually split into work intervals and rest intervals. These intervals can vary depending on your goals.
Reps (repetitions) - A repetition (rep) is one complete motion of a given exercise. Multiple reps make up one set.
Sets - A set is a sequence of reps either counted or timed before moving on to the next element of the workout or the next rest interval.
Rest - The time either between exercise sets or exercise rounds that you spend recovering. Rest is an important component of a workout, and is still active time. Adequate rest for your goal means you can give your best effort on the next set or round.
Rounds - Typically in circuit, EMOM or AMRAP styles (covered later), a round is one completion of a sequence of exercises, usually followed by rest/recovery periods.
KG - Kilogram unit of weight.
LBS - Pounds unit of weight.
POOD - Russian unit of weight - now typically associated with GS (Girevoy Sport).
1 POOD = 16kg / 35lbs. 1.5 POODs = 24kg / 53lbs. 2 POODs = 32kg / 71lbs.
20. GS (Girevoy Sport) - The kettlebell sport, born out of the USSR in 1948. Whilst it was enjoyed nationally through the USSR from the mid-20th century, the first International GS federations were formed around 1992 after the fall of the Soviet Union, bringing the sport to the rest of the world.

If you are new to kettlebells and unsure which weight you need to start with, you might find this post useful as well.
Hard-Style - This style of training is perhaps more mainstream than the competitive soft-style, and is supposed to feel heavy. As a result, hard-style training mainly uses two types of movements: ballistics and grinds. The main aim with this system of training is to develop power and strength with lower rep ranges or shorter timed intervals. These typically range from 6-10 reps for grinds, or 20-40 second bouts for ballistics depending on the goal.
Grind Exercises - Slow, controlled, strength-focussed movements. An example of a grind-type exercise would be strict press from the rack position which we will discuss later.
Ballistic Exercises - Fast, explosive movements focussing on power or endurance. A common example of a ballistic-style exercise would be the kettlebell swing.
For more information on the nuances between training with Ballistics and Grinds, you can read here.
Soft-Style - Style of kettlebell exercise mainly - but not always exclusively - used for kettlebell sport/competition. This style allows for efficient or 'soft' transitions from rep to rep, saving the user's grip. Most commonly, gyms which utilise soft-style and long-cycle training systems are preparing athletes for their competitive bouts..
Long Cycle - The training systems used for competitive kettlebells. The aim here is training for a long duration of time. for example, performing kettlebell snatches with a set weight for10-minute rounds without placing the kettlebell down is a common competition round.

The Insertion - The point in exercises like cleans or snatches when the pull becomes a push and the hand punches through the window of the kettlebell.
The drop - Lowering phase of the kettlebell typically returning from an Overhead Lockout Position (covered shortly).
The Dip - Absorption of downward force by bending the knees in time with setting the rack. This usually directly follows a drop after holding a heavy kettlebell overhead.
The Two Main Kettlebell Types:

Hard-Style Kettlebells - Whilst competition kettlebells do work well for hard style training, the large body can make it awkward for certain exercise combinations.
With hard-style kettlebells, the smaller body compared to the handle can make it easier to load up heavy for some exercises, such as holding a kettlebell in either hand without the size of the bell being particularly cumbersome.
This same ratio of body to handle can make it more challenging to adapt to a new kettlebell though - with a hard-style kettlebell, the body changes size in line with the weight.
Competition/Soft-Style Kettlebells - These kettlebells are a great, all-round tool for users at all levels of kettlebell training. "Competition style" just means they are uniform in size despite changes in weight, which makes adapting to a new weight simple as the feel doesn't change much.
The competition bell is often used for endurance and long cycle training for competitive kettlebell sport - as the name suggests - but are also suitable for heavy and ballistic training as well. The main downside does come from the amount of space they take up compared to their hard-style counterparts, making it less efficient for a home gym, and more cumbersome to learn with initially.
If you are looking for more specific terms around kettlebell sport, there are some addional terms in this Rockfit post.
Part 2: Grips & Positions
Grip - A grip simply is the type of hold you have on the kettlebell once you pick it up.
Position - A position is the stance you take with your body to perform an exercise once you have selected your grip.
Two-Handed (2H) Grips:

Horn Grip - Both hands take hold around the horns of the kettlebell. The base of the kettlebell here points towards the floor.
Bottom's Up (BU) Horn Grip - Hands around the horns of the kettlebell, this time with the bottom/base of the bell inverted, facing upward to the ceiling.
Goblet - Palms squeeze the sides of the kettlebell, the handle can either face up or down depending on your comfort here. The bell can be comfortably rotated so that the handle faces away from the body, allowing the bell to rest snugly against your centre of mass.
Crush Grip (AKA By The Body) - This grip requires holding the kettlebell by its body, and near your body. This hold is similar to the horns grip although the thumbs are placed at the base of either horn, and the hands are around the main body of the kettlebell.

Hammer Grip - It is unconventional, but it has its place with a few exercises.
One-Handed (1H) Grips:

Clamp Grip - Thumb tightly wrapped around the handle, allows for a tighter hold and more grip with strength focussed exercises.
Hook Grip - Thumb open alongside the handle, which is hooked only by the fingers. Allows the kettlebell handle to roll more easily around the hand and can be useful for endurance or soft-style exercises.
1H Centre - One-Handed kettlebell grip with the holding hand in the centre of the handle.
1H Corner (Inside vs Outside Grip) - The corners are on the edges of the handle. Inside and outside are terms used to relate which side of the kettlebell you interact with.
This is especially useful in a class environment as the instructor has to relate your body to the kettlebell without the perspective differences of left and right, which change per person depending on the arm they choose. Here is the difference:
Inside Corner - The hand holding the kettlebell is on the opposite side of the handle to your arm (right hand to left corner).
Outside Corner - The hand holding the kettlebell is on the same side of the kettlebell handle as your arm. (right hand to right corner).
Top tip: To visualise which corner is being referred to, step up to the kettlebell, take hold of the handle. Now point your thumb. If your thumb hangs off the edge, your hand has crossed the kb's midline, to the 'inside' of the bell. If your thumb is along the majority of the handle, then your hand is still on the 'outside' of the kettlebell.

French Grip (AKA Bottom's Up) - The Kettlebell is held by the handle and inverted, the base facing upward.
This grip shifts the balance so that you need to focus to your wrists and elbows in this position.
The French grip can be used in conjunction with exercises like presses, cleans and getups in order to further challenge grip strength, as well as the wrist, forearm and shoulder muscles with the added instability from the bell.

Sideways Horn Grip (Fireman’s Grip) - One-Handed kettlebell grip with the holding hand on the side of the horn, thumb usually facing away from the body of the kettlebell, although it can be held in reverse as well.
This grip is largely just used for an interesting way to perform a row or carry, more so if grip strength in this position is important and you're not surrounded by lots of kettlebells. It does present an additional challenge for the forearm muscles over a normal handle grip, making the weight you hold feel heavier than usual.
This can be a good option if you are training at home and don't have a range of weight options available to you. If you do have more kettlebells to use, usually it just makes sense to carry heavier with a standard handle grip.

Alternate versions of the Fireman's grip
Standing Positions:
For most standing positions, feet are usually positioned hip to shoulder width apart as is comfortable and strong, ready to support your body.

2H Dead Position (AKA Dead Stop / Dead Start) - The kettlebell is on the floor centred between the feet, hips pushed backwards, both hands holding the handle. Knees should be bent until your chest is higher than your hips, and you feel the tension shifting towards your glutes.
1H Dead Position (AKA Athletic Stance) - Set up just like above, the only change being one hand is away from the bell. I prefer a stabilising arm out to the side here. With one hand on the handle, this powerful position is much more likely to explode into heavy cleans and snatches.
To further strengthen either dead stance, you can also engage your lats* (the strong back muscles below your armpits) to strengthen your stance. This turns you into a coiled spring ready to transfer all that energy into your next exercise.
Top tip*: Engaging the lats can be achieved by imagining you are trying to squeeze your shoulders into your pockets
The Hike Start - This position utilises a similar stance to the dead start, except the arms are extended with the kettlebell at arms length. The bell is tilted towards you, with the horns following the direction of your arm. This start point efficiently lets you launch into powerful kettlebell swings without having to gently wind up your swing for a few seconds from the 2H Hanging Position (Next up).
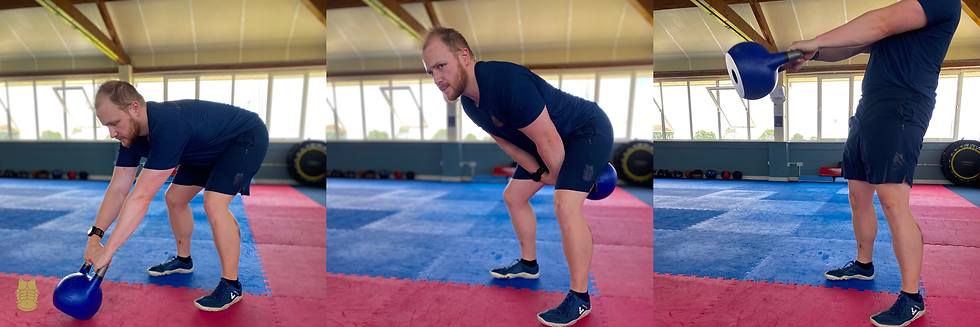
Hanging Position (1H or 2H) - Either both hands or one hand are holding the kettlebell by the handle, kettlebell resting at arms length around pelvis height.

The Three Main Rack Positions:
Rack Position - This s a staple for a your more classic kettlebell movements such as cleans, presses, circles, and returning from snatches. Here is a brief checklist for a strong rack positon.
The handle rests in the "L" of your hand at an angle across to the heel of your palm. (See right pic below). Your wrist should be strong, "punching" through the window, not being bent back by the kettlebell (see left pic below)..
Once your hand is closed, your thumb should be resting ideally against the middle of your chest, or somewhere along your collarbone is also safe. As close to your sternum as possible is best. Here the position of the kettlebell should feel strong and secure. This keeps the kettlebell near your centre of mass.
There should now be three main points of contact between you and the kettlebell, these being:
a. The corner of your thumb,
b. The outside (little finger side) of your wrist,
c. Your forearm/bicep near your elbow.
You can also hold two kettlebells here, one in either hand, for a Dbl. (Double) Rack Position.

Supported Rack Position - Feet shoulder width apart, kettlebell is held at chest height. One hand is around the handle, the other is around the body/base of the bell. This should be a comfortably supported position hence the name.
Bottom's Up Rack Positions (BU) - Like the Rack Position, except the kettlebell is held by the handle and inverted, positioned above the stacked wrist and elbow joints. Bottom's Up positions challenge grip, forearm and shoulder strength more than standard holds.
You might notice in the comparison below, that my elbow is more tucked in the BU rack position. This is due to the change in centre of gravity. My joints are still directly under the weight, but it looks a little different to the normal rack with my forearm more vertical.

Strong Overhead Positions:
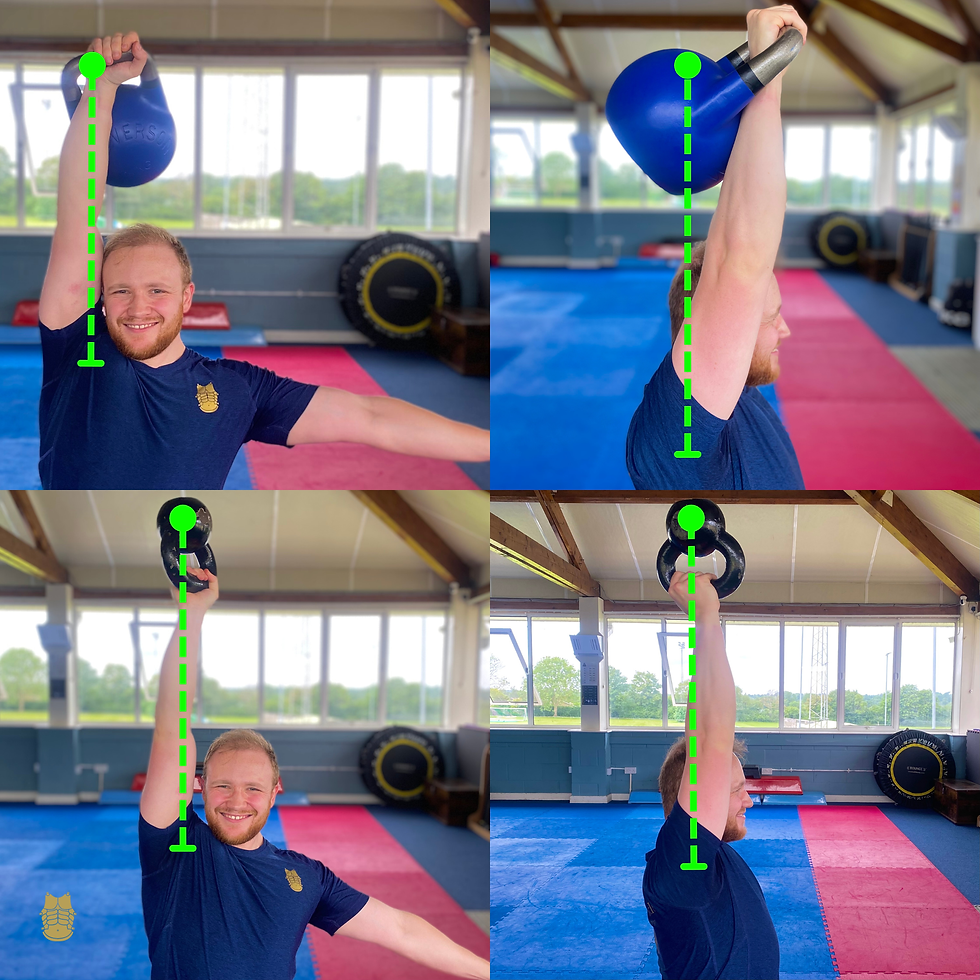
Overhead (OH) Lockout - The kettlebell is held similar to the rack position, still resting on the forearm, except it is raised overhead, bicep 'glued' to your ear. Your joints should be comfortably stacked below the centre of mass.
Bottom's-Up Overhead (BUOH) - Similar to the standard OH lockout, except the kettlebell is held inverted above the hand. This requires a strongly braced upper back and core. Much like the Bottom's Up Rack Position, this now requires a great deal of concentration and awareness to keep strong.
Strong kneeling positions:
Tall Kneeling - This position is quite simple, as you kneel on both knees. It is important to keep the hips pushed forwards keeping your upper body tall. You can engaging the glutes and abs to stabilise your position. Exercises performed from this position require added core stabilisation, as you don't have your feet supporting you.
Half Kneeling - This position provides less support than standing, but more support than the tall kneeling position. Here you should also keep your hips forwards, but can also place one foot in front of you for added support. Exercises performed here should be repeated on both sides for muscular balance.

Two Strong Lying Positions:
Lying Rack Position - Much like the rack position from a vertical (standing or kneeling) position, the kettlebell rests comfortably on the forearm here, making pressing based movements accessible. Your wrist should be above your elbow here. Your elbow should be 30-45 degress away from your body. You can also transition into the beginning of the much loved Turkish Getup from this position as well.
Lying Crush Grip / By-the-Body - A strong start for heavier chest presses or pullover type exercises. As with anything lifting weights overhead (or in this case over your face) if your grip begins to slip, control the bell down and reset before continuing the exercise. Safety first!

Part 3: Workout formats common to Kettlebell Training:
Chain - Multiple exercises which are strung together to create a 'chain' which you perform for either a set number of rounds or for a dedicated time before resting.
A powerful beginner chain could look like this: a Kettlebell Power Clean, into a Rack position Squat, followed by a Push Press, Into a Lateral Lunge, and repeat on the other side.
Complex - A round of exercises which are performed sequentially for a number of reps before moving on to the next one. Much like the chain, this is usually completed for a set number of rounds or for a timed set before resting.
An example of a full body complex which incorporates kettlebells with bodyweight exercise could be: 10 Kettlebell Swings, followed by 10 Press-ups, followed by 10 Goblet Squats, followed by 10 Gorilla Rows, rest, would be a basic complex.
Flow / Juggling - Kettlebell flow or juggling is similar to a chain, except incorporates flips and tosses into the mix, in which you learn to move with the momentum of the kettlebell. This shares similarities with steel mace flow.
EMOM - Every Minute On the Minute - At the start of each minute, you begin your exercise or sequence of exercises. The remainder of that minute once your exercise(s) are completed, is rest. Once your next minute begins, so does your next round of exercise.
Typical EMOM lengths vary between 10 and 20 minutes. You can adjust your intensity through your working interval to either train faster and get more rest, or train more steadily throughout your minute for less overall rest.
AMRAP - As Many Rounds As Possible - For a set time, you must complete the exercise sequence as many times as you can before the time is up. Again this can usually be paced depending on your goals or the environment (own workout vs class environment etc).
TABATA - A form of interval training which is designed to be near maximal effort. One total round of Tabata only lasts 4 minutes. The format for Tabata follows a 20 seconds work interval, followed by 10 second rest interval, eight times through. This could be one single exercise performed for eight sets, or another common Tabata method is to pair exercises. Here, you would complete two exercise four times each, typically in an alternating fashion. Tabata best utilises simple exercises which you can hit hard for the short amount of time, and require minimal transition in your brief rest period.
HIIT - High Intensity Interval Training - HIIT is a bit of a broader term really, as methods like Tabata do fall under this umbrella. The benefits of HIIT largely come down to power, conditioning and endurance. The short interval times and high work rate mean it is not so useful for strength and muscle building, but good for the higher heart rate zones, the lungs and muscular endurance.
The HIIT method is a popular way to train with kettlebells, often using timed working sets of 20 - 40 seconds, followed by 10 - 20 seconds of rest before moving to the next exercise. It is common to combine kettlebell exercises with bodyweight exercises for an effectove, space-saving home worokout. Alternatively, combining other pieces of equipment at your gym can make for an effective session depending on your goals.
What have you learned most from these kettlebell terms and tips?
Hopefully throughout this handbook you have learned some useful information regarding terminology and helpful tips which can kickstart your knowledge as you incorporate kettlebells into your fitness. You can now find your way around a kettlebell, have learned the common grips and positions needed most of your exercise library, and also have some key fitness styles for you to begin following if they align with your goals.
Is there something in particular you feel you have learned the most about kettlebells from this post? Is there something you feel you are still missing after reading this blog? Is there anything that surprised you in particular? Please let me know using the comments feature on the page.
Sean Taylor
Personal Trainer and Kettlebell Instructor

Comments